Showing posts with label C#. Show all posts
Showing posts with label C#. Show all posts
Tuesday, September 27, 2011


Thursday, September 15, 2011
Adding, Retrieving Name objects from a Hashtable in C#.Net
Hashtable is nothing but a collection of objects. To get brief idea,
Take a few instance of Name Class and add them to a Hashtable. Your Name will be value for Hashtable but you need to decide about key. key will unique in the Hashtable. When you are retrieving values from Hashtable this key place a major role.
First thing you need to add is namespace for Hashtable.
using System.Collections;
then take few instance of your class Name.
//Creating few instances for Class Name
Name emmu = new Name("Emmaneale", "Mendu");
Name vamshi = new Name("Vamshi", "Malyala");
Name pradeep = new Name("Pradeep", "Kandula");
We got our Values ready. So lets use initials as our key to insert into Hastable as shown below.
//Add Names into Hashtable
Hashtable SampleHashtbl = new Hashtable();
SampleHashtbl.Add("EM", emmu);
SampleHashtbl.Add("VM", vamshi);
SampleHashtbl.Add("PK", pradeep);
here if you try to use duplicates for key. You will get an error as shown in Figure 1.

//Retrieve Names from Hastable
Name ex = (Name)SampleHashtbl["EM"];
if (ex != null)
Response.Write(ex.FullName + "<br/>");
else
Response.Write("NOT FOUND<br/>");
To retrieve we need key string. If it didn't found the key it returns null. So check before display.
That's a small example on Hashtable.
Here is the Complete Code and Output in Figure 2.
protected void Page_Load(object sender, EventArgs e)
{
//Creating few instances for Class Name
Name emmu = new Name("Emmaneale", "Mendu");
Name vamshi = new Name("Vamshi", "Malyala");
Name pradeep = new Name("Pradeep", "Kandula");
//Add Names into HashTable
Hashtable SampleHashtbl = new Hashtable();
SampleHashtbl.Add("EM", emmu);
SampleHashtbl.Add("VM", vamshi);
SampleHashtbl.Add("PK", pradeep);
//Retrieve Names from HasTable
Name ex = (Name)SampleHashtbl["EM"];
if (ex != null)
Response.Write(ex.FullName + "<br/>");
else
Response.Write("NOT FOUND<br/>");
ex = (Name)SampleHashtbl["VM"];
if (ex != null)
Response.Write(ex.FullName + "<br/>");
else
Response.Write("NOT FOUND<br/>");
ex = (Name)SampleHashtbl["PK1"];
if (ex != null)
Response.Write(ex.FullName + "<br/>");
else
Response.Write("NOT FOUND<br/>");
}
public class Name
{
string FirstName;
string LastName;
//Constructor for our Class
public Name(string first, string last)
{
FirstName = first;
LastName = last;
}
//public property for FullName
public string FullName
{
get
{
return FirstName + " " + LastName;
}
}
}

Emmaneale Mendu
.Net Developer
Take a few instance of Name Class and add them to a Hashtable. Your Name will be value for Hashtable but you need to decide about key. key will unique in the Hashtable. When you are retrieving values from Hashtable this key place a major role.
First thing you need to add is namespace for Hashtable.
using System.Collections;
then take few instance of your class Name.
//Creating few instances for Class Name
Name emmu = new Name("Emmaneale", "Mendu");
Name vamshi = new Name("Vamshi", "Malyala");
Name pradeep = new Name("Pradeep", "Kandula");
We got our Values ready. So lets use initials as our key to insert into Hastable as shown below.
//Add Names into Hashtable
Hashtable SampleHashtbl = new Hashtable();
SampleHashtbl.Add("EM", emmu);
SampleHashtbl.Add("VM", vamshi);
SampleHashtbl.Add("PK", pradeep);
here if you try to use duplicates for key. You will get an error as shown in Figure 1.
Figure 1
Done with inserting. Now lets retrieve them and display on our page.//Retrieve Names from Hastable
Name ex = (Name)SampleHashtbl["EM"];
if (ex != null)
Response.Write(ex.FullName + "<br/>");
else
Response.Write("NOT FOUND<br/>");
To retrieve we need key string. If it didn't found the key it returns null. So check before display.
That's a small example on Hashtable.
Here is the Complete Code and Output in Figure 2.
protected void Page_Load(object sender, EventArgs e)
{
//Creating few instances for Class Name
Name emmu = new Name("Emmaneale", "Mendu");
Name vamshi = new Name("Vamshi", "Malyala");
Name pradeep = new Name("Pradeep", "Kandula");
//Add Names into HashTable
Hashtable SampleHashtbl = new Hashtable();
SampleHashtbl.Add("EM", emmu);
SampleHashtbl.Add("VM", vamshi);
SampleHashtbl.Add("PK", pradeep);
//Retrieve Names from HasTable
Name ex = (Name)SampleHashtbl["EM"];
if (ex != null)
Response.Write(ex.FullName + "<br/>");
else
Response.Write("NOT FOUND<br/>");
ex = (Name)SampleHashtbl["VM"];
if (ex != null)
Response.Write(ex.FullName + "<br/>");
else
Response.Write("NOT FOUND<br/>");
ex = (Name)SampleHashtbl["PK1"];
if (ex != null)
Response.Write(ex.FullName + "<br/>");
else
Response.Write("NOT FOUND<br/>");
}
public class Name
{
string FirstName;
string LastName;
//Constructor for our Class
public Name(string first, string last)
{
FirstName = first;
LastName = last;
}
//public property for FullName
public string FullName
{
get
{
return FirstName + " " + LastName;
}
}
}
Figure 2
Emmaneale Mendu
.Net Developer
Thursday, September 8, 2011
Arrays with C# Classes
Arrays with C# Classes
Arrays works as collections of items, for instance strings. You can use them to gather items in a single group.
Here Below Example i created a Class called Name. In which we have a Two variables, A constructor expecting two inputs First and Last name. and a property that returns Full Name of a Person Name.
Its a very simple example where i am putting all Names in to an array called GroupOfFriends. Printing all Names is very easy you can use either For loop or Foreach Loop. I used Foreach.
I used WebSite page to work on this example:
.cs Code Calling Class Name from Page_Load
using System;
using System.Collections.Generic;
using System.Linq;
using System.Web;
using System.Web.UI;
using System.Web.UI.WebControls;
using System.Collections;
public partial class September_Sep08 : System.Web.UI.Page
{
protected void Page_Load(object sender, EventArgs e)
{
//Creating few instances for Class Name
Name emmu = new Name("Emmaneale", "Mendu");
Name vamshi = new Name("Vamshi", "Malyala");
Name pradeep = new Name("Pradeep", "Kandula");
//Creating an Array to maintain Group of Names
Name[] GroupOfFriends = { emmu, vamshi, pradeep };
Response.Write("List of Names in the FriendsList:<br/>");
//Using foreach to print the Names
foreach (Name p in GroupOfFriends)
{
Response.Write(p.FullName + "<br/>");
}
}
public class Name
{
string FirstName;
string LastName;
//Constructor for our Class
public Name(string first, string last)
{
FirstName = first;
LastName = last;
}
//public property for FullName
public string FullName
{
get
{
return FirstName + " " + LastName;
}
}
}
}
Your outPut looks like below Figure

Arrays works as collections of items, for instance strings. You can use them to gather items in a single group.
Here Below Example i created a Class called Name. In which we have a Two variables, A constructor expecting two inputs First and Last name. and a property that returns Full Name of a Person Name.
Its a very simple example where i am putting all Names in to an array called GroupOfFriends. Printing all Names is very easy you can use either For loop or Foreach Loop. I used Foreach.
I used WebSite page to work on this example:
.cs Code Calling Class Name from Page_Load
using System;
using System.Collections.Generic;
using System.Linq;
using System.Web;
using System.Web.UI;
using System.Web.UI.WebControls;
using System.Collections;
public partial class September_Sep08 : System.Web.UI.Page
{
protected void Page_Load(object sender, EventArgs e)
{
//Creating few instances for Class Name
Name emmu = new Name("Emmaneale", "Mendu");
Name vamshi = new Name("Vamshi", "Malyala");
Name pradeep = new Name("Pradeep", "Kandula");
//Creating an Array to maintain Group of Names
Name[] GroupOfFriends = { emmu, vamshi, pradeep };
Response.Write("List of Names in the FriendsList:<br/>");
//Using foreach to print the Names
foreach (Name p in GroupOfFriends)
{
Response.Write(p.FullName + "<br/>");
}
}
public class Name
{
string FirstName;
string LastName;
//Constructor for our Class
public Name(string first, string last)
{
FirstName = first;
LastName = last;
}
//public property for FullName
public string FullName
{
get
{
return FirstName + " " + LastName;
}
}
}
}
Your outPut looks like below Figure
Wednesday, September 7, 2011
Tuesday, September 6, 2011
User Controls in ASP.NET
User Control
User Control represents the simplest form of ASP.NET control encapsualtion. Because they are the simplest, they are very easy to create and use. Mainly the grouping of existing server controls into a single control is a user control. User control code looks very similar to .aspx code as they use same html codes but this control wont have html, head tags. As you see user control takes .ascx extension whereas ASP.NET web page take .aspx, we have code behind fro user control as well .ascx.cs
Creating User Control
Creating user control is very simple in Visual Studio. To create a new user control, you first add a new user control file to your Web site. from the wesite menu, select Add New Item option(as shown Figure 1).

Figure (1)
After selecting Add New File dialog Box appears. Select Web User Control in templates section and in the Name Field you can assign a name with .ascx extension and click Add button buttom of the Add New Item dialog box(as Shown Figure 2).

Figure (2)
After adding user control in to your website it may look like this with different image(as shown in Figure 3)

Figure (3)
with an extension .ascx, this extension indicates that this is a user control.
As you see HTML source looks like below code
<%@ Control Language="C#" AutoEventWireup="true" CodeFile="UserControl.ascx.cs" Inherits="UserControl" %>
ASP Web Page has this type of code
<%@ Page Language="C#" AutoEventWireup="true" CodeFile="Sep06.aspx.cs" Inherits="practice_Sep06" %> Here user control use @Control directive rather than the @Page directive, which a web page would use. Did you notice there is no default HTML tags for User control like head, body and form. Now you can add couple of server controls to your user controls. Adding Controls to user Control Its very simple Go to Design Mode in .ascx file. drag controls from Toolbox onto your user control as your requirement, I added a Label Control and a Button Control(as shown in Figure 4).

Figure (4)
In Code Behind lets add a few steps of code before adding user control to the web page.
protected void Page_Load(object sender, EventArgs e)
{
Label1.Text = "WelCome to My First user Control";
}
protected void Button1_Click(object sender, EventArgs e)
{
Label1.Text = "You Clicked on the Button";
}
Double click on the button to get Button click event. Lets go to important part Adding user Control to web page. Adding User Control to Web Pages Its very simple Go to your web page(.aspx) in design mode drag and drop user control in a particular area as your requirement. Thats it you see the same you see on web user control design here on ASP Web Page. Try to run the web page it should look like(as shown in Figure 5).

Figure (5)
Cool Then try to click on the Button then you see the Label Text Change to "You Clicked on the Button"(as shown in Figure 6).
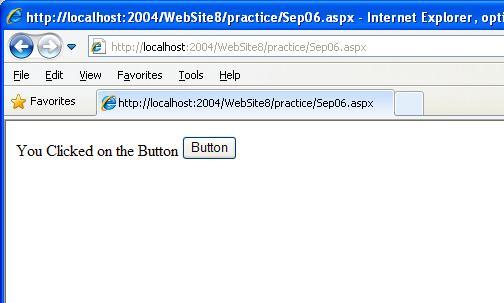
Figure (6)
If you see this then your user control is working fine. Hence, Your first user control is ready to use, you can add this user control to multiple pages as your requirement. By this way you can Html Tables to format the controls to your user controls.
Tuesday, August 30, 2011
Friday, August 26, 2011
Server-Side State Management
| Server-Side Option | Pros | Cons |
| Application State | Fast. Shared among all users. | State is stored once per server in multiple server configurations. |
| Cache Object (Application Scope) | Like the Application includes expiration via Depencies. | State is stored once per server in multiple server configurations. |
| Session State | Three choices in process, out of process, DB-backed. Can be configured as cookieless. | Can be abused. You pay a serialization cost when objects leave the process. In process requires Web server affinity. Cookies configuration makes it easier to hijack. |
| Database | State can be accessed by any server in a Web farm. | Pay a serialization and persistence cost when objects leave the process. Requires SQL Server license. |
Sunday, August 14, 2011
What are the two different levels of variables that are supported by ASP.Net
- Page Level variable : Int, float, char, string and all other .Net data type whose scope is limited to that particular page only.
- Object level variable : Application Level, Session Level that is used to access the data throughout the application.
Friday, August 12, 2011
Explain what is the purpose of using EnableViewState property?
- When a page is postback, then it allows the page to save the users input on a form.
- It also saves all the server side values as a hidden value on the page before sending that page to the clients for a particular given control in the ViewState.
- When a page is posted back to the server, at the same time the server control is recreated within the state stored in ViewState.
Tuesday, August 9, 2011
What is ASP.NET?
- ASP stands for Active Server Pages
- ASP.NET is the name of the MICROSOFT technology used for web site development.
- There are several other technologies exist for web development.
- ASP.NET is the technology from MICROSOFT and it is widely used one.
- ASP.NET is not ASP. ASP.NET is an entirely new technology for server side scripting. It was written from the ground up and is not backward compatible with classic ASP.
- ASP.NET is NOT a programming language like C# or VB.NET.
- ASP.NET development requires a programming language like C# or VB.NET to write code.
- ASP.NET technology comes with a rich set of components and controls that make the web development very easy.
- Visual Studio .Net is the editor from MICROSOFT which helps you develop ASP.NET sites faster
- IIS(Internet Information Syatems) is the web server from MICROSOFT which supports ASP.NET. To develop ASP.NET web sites, you must have IIS installed in your computer.
Thursday, August 4, 2011
Difference between Web Site and Web application in ASP.NET
• Development Wise Difference
Web Site
1. We can code one page in C# and one page in vb.net (Multiple programming languages allowed).
2. We cannot call (access) public functions from one page to other page.
3. Utility classes / functions must be placed in a special ASP.NET folder (the App_Code folder)
4. Web Sites do not have a .csproj/.vbproj file that manages the project (the folder that contains the site becomes the project root).
5. In the Web Site project, each file that you exclude is renamed with an exclude
keyword in the filename.
6. Explicit namespaces are not added to pages, controls, and classes by default, but you can add them manually.
Web Application
1. Only one programming language allowed per project (Need to decide on programming language when starting project).
2. We can access public functions from one page to other page.
3. Utility classes / function can be placed anywhere in the applications folder structure.
4. Web Applications are treated like other .NET projects and are managed by a project file (.csproj or .vbproj) .
5. One nice feature of the Web Application project is it's much easier to exclude files from the project view.
6. Explicit namespaces are added to pages, controls, and classes by default.
• Deployment wise difference
Web Site
1. It has its code in a special App_Code directory and it's compiled into several DLLs (assemblies) at runtime.
2. No need to recompile the site before deployment.
3. We need to deploy both .aspx file and code behind file.
4. Small changes to the site do not require a full re-deployment. (We can upload the code file that was changed)
Web Application
1. web application is precompiled into one single DLL.
2. Site has to be pre-compiled before deployment .
3. Deploy only .aspx page, but not associated code file (the pre-compiled dll will be uploaded) .
4. Even small changes require a full re-compile of the entire site(i.e. if the code for a single page changes the whole site must be compiled) (It requires careful planning to ensure new bugs aren't introduced to the production site when uploading bug fixes or other changes.)
sample format of .CSPROJ file in web application
Written By
Suresh Ruddarraju
.Net Developer
Web Site
1. We can code one page in C# and one page in vb.net (Multiple programming languages allowed).
2. We cannot call (access) public functions from one page to other page.
3. Utility classes / functions must be placed in a special ASP.NET folder (the App_Code folder)
4. Web Sites do not have a .csproj/.vbproj file that manages the project (the folder that contains the site becomes the project root).
5. In the Web Site project, each file that you exclude is renamed with an exclude
keyword in the filename.
6. Explicit namespaces are not added to pages, controls, and classes by default, but you can add them manually.
Web Application
1. Only one programming language allowed per project (Need to decide on programming language when starting project).
2. We can access public functions from one page to other page.
3. Utility classes / function can be placed anywhere in the applications folder structure.
4. Web Applications are treated like other .NET projects and are managed by a project file (.csproj or .vbproj) .
5. One nice feature of the Web Application project is it's much easier to exclude files from the project view.
6. Explicit namespaces are added to pages, controls, and classes by default.
• Deployment wise difference
Web Site
1. It has its code in a special App_Code directory and it's compiled into several DLLs (assemblies) at runtime.
2. No need to recompile the site before deployment.
3. We need to deploy both .aspx file and code behind file.
4. Small changes to the site do not require a full re-deployment. (We can upload the code file that was changed)
Web Application
1. web application is precompiled into one single DLL.
2. Site has to be pre-compiled before deployment .
3. Deploy only .aspx page, but not associated code file (the pre-compiled dll will be uploaded) .
4. Even small changes require a full re-compile of the entire site(i.e. if the code for a single page changes the whole site must be compiled) (It requires careful planning to ensure new bugs aren't introduced to the production site when uploading bug fixes or other changes.)
sample format of .CSPROJ file in web application
<Project xmlns="http://schemas.microsoft.com/developer/msbuild/2003">
  <PropertyGroup>
    <ProjectView>ProjectFiles</ProjectView>
  </PropertyGroup>
  <ProjectExtensions>
    <VisualStudio>
      <FlavorProperties GUID="{349c5851-65df-11da-9384-00065b846f21}">
        <WebProjectProperties>
          <StartPageUrl>CheckboxListTest.aspx</StartPageUrl>
          <StartAction>SpecificPage</StartAction>
          <AspNetDebugging>True</AspNetDebugging>
          <NativeDebugging>False</NativeDebugging>
          <SQLDebugging>False</SQLDebugging>
          <PublishCopyOption>RunFiles</PublishCopyOption>
          <PublishTargetLocation>
          </PublishTargetLocation>
          <PublishDeleteAllFiles>False</PublishDeleteAllFiles>
          <PublishCopyAppData>True</PublishCopyAppData>
          <ExternalProgram>
          </ExternalProgram>
          <StartExternalURL>
          </StartExternalURL>
Written By
Suresh Ruddarraju
.Net Developer
Monday, August 1, 2011
CoolTuts - C#.Net - Singleton Design Pattern
Definition:
Ensure a class has only one instance and provide a global point of access to it.
Objectives:
{
static void Main(string[] args)
{
Singleton a = Singleton.Instance();
//Add a shared variable referencing the the
//single instantiated instance of the class.
a.FullName = "Emmaneale Mendu";
Singleton b = Singleton.Instance();
Console.WriteLine("My FullName is {0}",b.FullName);
Singleton c = Singleton.Instance();
Console.WriteLine("My FullName is {0}", c.FullName);
if (b == c)
Console.WriteLine("Two Instances are same");
Console.ReadKey();
}
}
public class Singleton
{
private static Singleton self;
private string name;
//Hide the default constuctor so that the class
//cannot be instantiated from outside of the class.
private Singleton() { }
//Create a custom constructor which returns the single
//instance of the object, once it is instantiated.
public static Singleton Instance()
{
if (self == null)
self = new Singleton();
return self;
}
public string FullName
{
get { return name; }
set { name = value; }
}
}
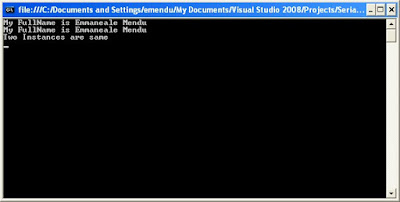 Hence I conclude that only one instance is created and only when the instance is needed.
Ensure a class has only one instance and provide a global point of access to it.
Objectives:
- Hide the default constuctor so that the class cannot be instantiated from outside of the class.
- Create a custom constructor which returns the single instance of the object, once it is instantiated.
- Add a shared variable referencing the the single instantiated instance of the class.
{
static void Main(string[] args)
{
Singleton a = Singleton.Instance();
//Add a shared variable referencing the the
//single instantiated instance of the class.
a.FullName = "Emmaneale Mendu";
Singleton b = Singleton.Instance();
Console.WriteLine("My FullName is {0}",b.FullName);
Singleton c = Singleton.Instance();
Console.WriteLine("My FullName is {0}", c.FullName);
if (b == c)
Console.WriteLine("Two Instances are same");
Console.ReadKey();
}
}
public class Singleton
{
private static Singleton self;
private string name;
//Hide the default constuctor so that the class
//cannot be instantiated from outside of the class.
private Singleton() { }
//Create a custom constructor which returns the single
//instance of the object, once it is instantiated.
public static Singleton Instance()
{
if (self == null)
self = new Singleton();
return self;
}
public string FullName
{
get { return name; }
set { name = value; }
}
}
 Hence I conclude that only one instance is created and only when the instance is needed.
Wednesday, July 27, 2011
CoolTuts - C# Articles - Home
C# Basic Topics
Console Application
C# Random Topics
Console Application
- Console Introduction
- Console Functions
- Console Formatting
- Console Classes
- Console Namespace
- Constructor and Destructor
- Console Arrays
- Console Out and Ref
C# Random Topics
- C# Topics
- Example on Console
- C# Hello World
- C# class example
Sunday, September 19, 2010
Arrays in Console Application/C#
Arrays in Console Application/C#
All programming languages come across the concept of arrays. So this is very important. Basically arrays are used to store a group of data which are having same data type. I will few examples of arrays in this post.
class abc
{
static void Main()
{
int[] array;
array = new int[3];
array[0] = 1;
array[1] = 2;
array[2] = 3;
Console.WriteLine(array[0]);
array[0]++;
Console.WriteLine(array[0]);
++array[1];
Console.WriteLine(array[1]);
int i=1;
Console.WriteLine(array[i]);
i = 5;
Console.WriteLine(array[i]); //Error
Console.ReadKey();
}
Error:
Index was outside the bounds of the array.
We declare arrays with a set of [] brackets. As our example int[] array means array is like of int[]. And instantiate array with new keyword. Number 3 in the square bracket indicate that the user want to store 3 items or 3 records. Hence in the array the items count/index start at ‘0’ and end at ‘n-1’. As shown in the example it starts at ‘0’ and end at ‘2’. But we are trying to pull the record that is not created so we got this error.
static void Main()
{
int[] array;
array = new int[3];
array[0] = 1;
array[1] = 2;
array[2] = 3;
Console.WriteLine(array[0]);
array[0]++;
Console.WriteLine(array[0]);
++array[1];
Console.WriteLine(array[1]);
int i=1;
Console.WriteLine(array[i]);
i = 2;
Console.WriteLine(array[i]); //Error
Console.ReadKey();
}
OutPut
1
2
3
3
3
Hurry! No errors, It looks we are having more code with similar content lets use loop concept to minimize the code. As shown below
class abc
{
static void Main()
{
int[] array;
array = new int[3];
int i;
for (i = 0; i < 3; i++)
array[i] = i + 1;
for (i = 0; i < 3; i++)
Console.WriteLine(array[i]);
Console.ReadKey();
}
}
OutPut
1
2
3
Hence we minimized the code and removed all errors. Now we will see how ‘foreach’ works with same code. As shown below.
class abc
{
static void Main()
{
int[] array;
array = new int[3];
int i;
for (i = 0; i < 3; i++)
array[i] = i + 1;
foreach(int p in array)
Console.WriteLine(p);
Console.ReadKey();
}
}
OuPut
1
2
3
All programming languages come across the concept of arrays. So this is very important. Basically arrays are used to store a group of data which are having same data type. I will few examples of arrays in this post.
class abc
{
static void Main()
{
int[] array;
array = new int[3];
array[0] = 1;
array[1] = 2;
array[2] = 3;
Console.WriteLine(array[0]);
array[0]++;
Console.WriteLine(array[0]);
++array[1];
Console.WriteLine(array[1]);
int i=1;
Console.WriteLine(array[i]);
i = 5;
Console.WriteLine(array[i]); //Error
Console.ReadKey();
}
Error:
Index was outside the bounds of the array.
We declare arrays with a set of [] brackets. As our example int[] array means array is like of int[]. And instantiate array with new keyword. Number 3 in the square bracket indicate that the user want to store 3 items or 3 records. Hence in the array the items count/index start at ‘0’ and end at ‘n-1’. As shown in the example it starts at ‘0’ and end at ‘2’. But we are trying to pull the record that is not created so we got this error.
static void Main()
{
int[] array;
array = new int[3];
array[0] = 1;
array[1] = 2;
array[2] = 3;
Console.WriteLine(array[0]);
array[0]++;
Console.WriteLine(array[0]);
++array[1];
Console.WriteLine(array[1]);
int i=1;
Console.WriteLine(array[i]);
i = 2;
Console.WriteLine(array[i]); //Error
Console.ReadKey();
}
OutPut
1
2
3
3
3
Hurry! No errors, It looks we are having more code with similar content lets use loop concept to minimize the code. As shown below
class abc
{
static void Main()
{
int[] array;
array = new int[3];
int i;
for (i = 0; i < 3; i++)
array[i] = i + 1;
for (i = 0; i < 3; i++)
Console.WriteLine(array[i]);
Console.ReadKey();
}
}
OutPut
1
2
3
Hence we minimized the code and removed all errors. Now we will see how ‘foreach’ works with same code. As shown below.
class abc
{
static void Main()
{
int[] array;
array = new int[3];
int i;
for (i = 0; i < 3; i++)
array[i] = i + 1;
foreach(int p in array)
Console.WriteLine(p);
Console.ReadKey();
}
}
OuPut
1
2
3
Monday, September 13, 2010
Saturday, September 11, 2010
Thursday, September 2, 2010
How to Append Image path to Text File using C#
by Emmaneale Mendu, Web Developer
.aspx
<%@ Page Language="C#" AutoEventWireup="true" CodeFile="Default.aspx.cs" Inherits="_Default" %>
<!DOCTYPE html PUBLIC "-//W3C//DTD XHTML 1.0 Transitional//EN" "http://www.w3.org/TR/xhtml1/DTD/xhtml1-transitional.dtd">
<html xmlns="http://www.w3.org/1999/xhtml">
<head runat="server">
<title>Image Button Example</title>
</head>
<body>
<form id="form1" runat="server">
<div>
<asp:Button ID="Button1" runat="server" Text="Button" onclick="Button1_Click" />
</div>
</form>
</body>
</html>
.cs
using System;
using System.Collections;
using System.Configuration;
using System.Data;
using System.Linq;
using System.Web;
using System.Web.Security;
using System.Web.UI;
using System.Web.UI.HtmlControls;
using System.Web.UI.WebControls;
using System.Web.UI.WebControls.WebParts;
using System.Xml.Linq;
using System.IO;
public partial class _Default : System.Web.UI.Page
{
protected void Page_Load(object sender, EventArgs e)
{
}
protected void Button1_Click(object sender, EventArgs e)
{
String FileName = Server.MapPath("Output.txt");
StreamWriter objStreamWriter;
objStreamWriter = File.AppendText(FileName);
String imagepath = Html32TextWriter.DoubleQuoteChar + "desibindaas.jpg"
+ Html32TextWriter.DoubleQuoteChar;
objStreamWriter.WriteLine("<img src=" + imagepath + " alt=" + Html32TextWriter.DoubleQuoteChar
+ "Emmu Image" + Html32TextWriter.DoubleQuoteChar + " /><br/>");
objStreamWriter.Close();
StreamReader objStreamReader;
objStreamReader = File.OpenText(FileName);
String contents = objStreamReader.ReadToEnd();
Response.Write(contents);
objStreamReader.Close();
}
}
Friday, August 27, 2010
C#.Net Features
Supports OOP Rules .Net technologies are implemented based on object oriented programing rules, In C#.Net rules we can implement data encapsulation, data abstraction, inheritance and polymorphism.
Console Application:
These are used to implement character user interface features, console application output getting in the dos prompt by default.
Windows Application:
Using windows application we can implement graphical user interface features, In the windows application getting pre-define container called form, form-container having collection of controlls.
Graphical designing interface(GDI)
Windows application by default depending on the graphical user interface features, using GUI features we can add the control, we can use the menu's, status box and etc., Using GDI without using any control we can give 2D graphics and 3D graphics in the Form Container.
Type Security
C#.Net language supports type security, In the C#.Net we have to convert all data type values manually, because of the type security in the C#.Net each and every statement is secured.
Structured exception handling
When the application having run-time errors the normal application execution terminates abnormally, to overcome this problem we have to work with exception handling.
Console Application:
These are used to implement character user interface features, console application output getting in the dos prompt by default.
Windows Application:
Using windows application we can implement graphical user interface features, In the windows application getting pre-define container called form, form-container having collection of controlls.
Graphical designing interface(GDI)
Windows application by default depending on the graphical user interface features, using GUI features we can add the control, we can use the menu's, status box and etc., Using GDI without using any control we can give 2D graphics and 3D graphics in the Form Container.
Type Security
C#.Net language supports type security, In the C#.Net we have to convert all data type values manually, because of the type security in the C#.Net each and every statement is secured.
Structured exception handling
When the application having run-time errors the normal application execution terminates abnormally, to overcome this problem we have to work with exception handling.
Tuesday, August 3, 2010
C# Architecture
C-language Arch(Dependent):
C-language supports one type of source code, one compiler and one type of binary format data, c-language source code can communicates with the c-compiler, compiler gives object format file, this file having c-language source code in the binary format and information about the operating system, object file can communicates with the one o/s directly. C-language is platform dependent.
Java-language Arch(Independent):
The java language supports one type of source code, one compiler and one type of binary format data, java-language supports java-c compiler this compiler communicates with the java language source code gives class format data. class file having only binary format data doesn't having information about o/s, for executing class file in the various types of operating systems. we have to use java virtual machine(jvm) communicator java lang. is a platform independent.
.Net Arch(Independent):
CSC:
csc is the sub-compiler in the .Net framework, this compiler communicates with the c#.net source code, csc compiler gives intermediate language format file.
Intermediate language format:
IL format having specific language types into the binary format, all IL formats communicates with the common language runtime compiler.
Common Type System(CTS):
Using cts we can convert different language data types into the common type, different data types having in the sub-compilers, common data types having in the CLR.
Common language Specification:
Using CLS we can convert different languages source code into the common source code, different languages source code having in the sub-compilers. common source code having in the CLR.
MSIL:
The MSIL format getting after communicating all sub-compilers with the CLR, MSIL having common type of data typesand source code, MSIL format can communicates with the various operating systems.
Just intime compiler:
JIT compiler is communicator between MSIL format and specific o/s, because of the JIT compilers the .Net technologies are platform independent.
C-language supports one type of source code, one compiler and one type of binary format data, c-language source code can communicates with the c-compiler, compiler gives object format file, this file having c-language source code in the binary format and information about the operating system, object file can communicates with the one o/s directly. C-language is platform dependent.
Java-language Arch(Independent):
The java language supports one type of source code, one compiler and one type of binary format data, java-language supports java-c compiler this compiler communicates with the java language source code gives class format data. class file having only binary format data doesn't having information about o/s, for executing class file in the various types of operating systems. we have to use java virtual machine(jvm) communicator java lang. is a platform independent.
.Net Arch(Independent):
CSC:
csc is the sub-compiler in the .Net framework, this compiler communicates with the c#.net source code, csc compiler gives intermediate language format file.
Intermediate language format:
IL format having specific language types into the binary format, all IL formats communicates with the common language runtime compiler.
Common Type System(CTS):
Using cts we can convert different language data types into the common type, different data types having in the sub-compilers, common data types having in the CLR.
Common language Specification:
Using CLS we can convert different languages source code into the common source code, different languages source code having in the sub-compilers. common source code having in the CLR.
MSIL:
The MSIL format getting after communicating all sub-compilers with the CLR, MSIL having common type of data typesand source code, MSIL format can communicates with the various operating systems.
Just intime compiler:
JIT compiler is communicator between MSIL format and specific o/s, because of the JIT compilers the .Net technologies are platform independent.
Saturday, July 31, 2010
C# Framework
.Net Framwork:
The microsoft introduced .Net framework in the 2000 year, the microsoft implemented collection of compilers in the .Net framework, .Net framework supports collection of namespaces.
Namespaces:
.Net framework is the collection of namespaces, every namespace is dynamic link library(DLL), namespaces having collection of object oriented programming features, namespace features we can distribute in the all .Net technologies.
Common Languages Runtime(CLR):
In .Net framework main compiler is CLR, CLR having common datatypes and common source code, In the CLR microsoft implemented 23 sub-compilers, each sub-compilers having different types of data types and source code. All sub-compilers communicates with the CLR for converting into the common type of data types and source code.
The microsoft introduced .Net framework in the 2000 year, the microsoft implemented collection of compilers in the .Net framework, .Net framework supports collection of namespaces.
Namespaces:
.Net framework is the collection of namespaces, every namespace is dynamic link library(DLL), namespaces having collection of object oriented programming features, namespace features we can distribute in the all .Net technologies.
Common Languages Runtime(CLR):
In .Net framework main compiler is CLR, CLR having common datatypes and common source code, In the CLR microsoft implemented 23 sub-compilers, each sub-compilers having different types of data types and source code. All sub-compilers communicates with the CLR for converting into the common type of data types and source code.
Subscribe to:
Posts (Atom)