This is a client side storage control. The word tells us this control is hiding on web-page right it hides from the world. So, typical hidden field control code looks like below.
<asp:HiddenField ID="HiddenField1" runat="server" />
There are several properties but I just cover two main properties
1) Value
2) Visible
Value: This property is used to assign or store some data in hiddenfield control as shown below.
<asp:HiddenField ID="HiddenField1" Value="Data to be Hidden from Web browser" runat="server" />
Try to work on this it wont display on your web browser.
Visible: This property is optional, but better to know what it does. You are hiding some important data or some confidential data in hidden field. You need to use visible property. why because when you run your program try this way.
Right click on your web browser and select view source. You can see the hidden field value on your source code page. So that reason I use visible property to hide it on view source page too.
<asp:HiddenField ID="HiddenField1" Visible="false" Value="Data to be Hidden from Web browser" runat="server" />
Thank you for reading
Emmaneale Mendu
Web Developer
Thursday, October 7, 2010


Wednesday, October 6, 2010
ASP Calendar Server Control
Word calendar makes user to select any date in the history so Microsoft introduced a control named Calendar server control you need to drag and drop control that’s it. A calendar appears on your web page which user can select any date in the history. A typical Calendar control is constructed as shown below.
<asp:Calendar ID="cldControl" runat="server"></asp:Calendar>

Above calendar control is a simple default one you can use some CSS styles or you can get some default designs from this control.
Right click on Calendar control and you see SHOW SMART TAG option

Check that and you see a small window at the top of your Calendar control

Select Auto format then you can select any default style you want sample selection is shown below Press OK.

Selecting a single day in the Calendar control
When user selects the date i am using a label control to display the date.

.aspx
<asp:Calendar ID="cldControl" runat="server"
OnSelectionChanged="cldControl_SelectionChanged" />
<asp:Label ID="lblDisplayDate" runat="server" />
.cs
protected void cldControl_SelectionChanged(object sender, EventArgs e)
{
lblDisplayDate.Text = "You have selected " + cldControl.SelectedDate.ToShortDateString();
}
Selecting whole week or whole month
In this case we use SELECTIONMODE property where you see four option to select Day, DayWeek, DayWeekMonth, None.
None – only readonly calendars use this option
So lets see DayWeekMonth in this below example.
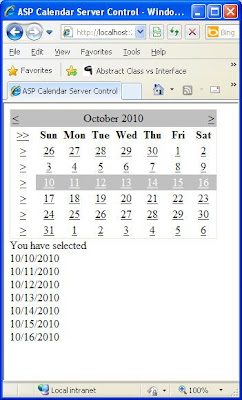
.aspx
<asp:Calendar ID="cldControl" runat="server" SelectionMode="DayWeekMonth"
OnSelectionChanged="cldControl_SelectionChanged" />
<asp:Label ID="lblDisplayDate" runat="server" />
.cs
protected void cldControl_SelectionChanged(object sender, EventArgs e)
{
lblDisplayDate.Text = "You have selected <br/>";
for (int i = 0; i < cldControl.SelectedDates.Count; i++)
{
lblDisplayDate.Text += cldControl.SelectedDates[i].ToShortDateString() + "<br/>";
}
}
That’s it a small post with examples on Calendar control. Thankyou for reading the post.
Emmaneale Mendu
Web Developer
<asp:Calendar ID="cldControl" runat="server"></asp:Calendar>

Above calendar control is a simple default one you can use some CSS styles or you can get some default designs from this control.
Right click on Calendar control and you see SHOW SMART TAG option

Check that and you see a small window at the top of your Calendar control

Select Auto format then you can select any default style you want sample selection is shown below Press OK.

Selecting a single day in the Calendar control
When user selects the date i am using a label control to display the date.

.aspx
<asp:Calendar ID="cldControl" runat="server"
OnSelectionChanged="cldControl_SelectionChanged" />
<asp:Label ID="lblDisplayDate" runat="server" />
.cs
protected void cldControl_SelectionChanged(object sender, EventArgs e)
{
lblDisplayDate.Text = "You have selected " + cldControl.SelectedDate.ToShortDateString();
}
Selecting whole week or whole month
In this case we use SELECTIONMODE property where you see four option to select Day, DayWeek, DayWeekMonth, None.
None – only readonly calendars use this option
So lets see DayWeekMonth in this below example.

.aspx
<asp:Calendar ID="cldControl" runat="server" SelectionMode="DayWeekMonth"
OnSelectionChanged="cldControl_SelectionChanged" />
<asp:Label ID="lblDisplayDate" runat="server" />
.cs
protected void cldControl_SelectionChanged(object sender, EventArgs e)
{
lblDisplayDate.Text = "You have selected <br/>";
for (int i = 0; i < cldControl.SelectedDates.Count; i++)
{
lblDisplayDate.Text += cldControl.SelectedDates[i].ToShortDateString() + "<br/>";
}
}
That’s it a small post with examples on Calendar control. Thankyou for reading the post.
Emmaneale Mendu
Web Developer
Tuesday, October 5, 2010
Input Box
Displays a prompt in a dialog box, waits for the user to input text or click a button, and returns the contents of the text box.
Example:
Input = InputBox("Input Something","Title of the Input Box","Default Text in the Input Box")
Msgbox ("You Entered " & Input)
Example:
Input = InputBox("Input Something","Title of the Input Box","Default Text in the Input Box")
Msgbox ("You Entered " & Input)
BulletedList server Control
This control is just a read only control where you can display the list of items in different formats as shown below.

In the above figure I shown you how it displays when you select different Bulletstyle property options
Circle, LowerAlpha, LowerRoman, UpperRoman etc.
And we have basic properties like BackColor, BorderStyle etc.
.aspx
<asp:BulletedList ID="BulletedList1" BulletStyle="Circle" runat="server">
<asp:ListItem>One</asp:ListItem>
<asp:ListItem>Two</asp:ListItem>
<asp:ListItem>Three</asp:ListItem>
<asp:ListItem>Four</asp:ListItem>
<asp:ListItem>Five</asp:ListItem>
</asp:BulletedList>
That’s it small post on Bulletedlist control.
Thanks
Emmaneale Mendu
Web Developer

In the above figure I shown you how it displays when you select different Bulletstyle property options
Circle, LowerAlpha, LowerRoman, UpperRoman etc.
And we have basic properties like BackColor, BorderStyle etc.
.aspx
<asp:BulletedList ID="BulletedList1" BulletStyle="Circle" runat="server">
<asp:ListItem>One</asp:ListItem>
<asp:ListItem>Two</asp:ListItem>
<asp:ListItem>Three</asp:ListItem>
<asp:ListItem>Four</asp:ListItem>
<asp:ListItem>Five</asp:ListItem>
</asp:BulletedList>
That’s it small post on Bulletedlist control.
Thanks
Emmaneale Mendu
Web Developer
ASP Table Server Control
This control is very common in all web pages because by default web page takes <table> tag for layout of your web page. The typical construction of the table server control looks like below code.

In the above figure you can see two headers (“First Name” and “Last Name”). We can use any header here. We have three tags to use in asp table tag
<asp:TableFooterRow></asp:TableFooterRow>
<asp:TableHeaderRow></asp:TableHeaderRow>
<asp:TableRow></asp:TableRow>
You can copy the code below to get the above webpage design
.aspx
<asp:Table ID="Table1" runat="server" Caption="Customer Details">
<asp:TableRow ID="trheader" BackColor="Silver" runat="server" ForeColor="Black" Font-Bold="true">
<asp:TableHeaderCell>First Name</asp:TableHeaderCell>
<asp:TableHeaderCell>Last Name</asp:TableHeaderCell>
</asp:TableRow>
<asp:TableRow>
<asp:TableCell>Emmaneale</asp:TableCell>
<asp:TableCell>Mendu</asp:TableCell>
</asp:TableRow>
<asp:TableRow>
<asp:TableCell>Swetha</asp:TableCell>
<asp:TableCell>Patcha</asp:TableCell>
</asp:TableRow>
</asp:Table>
That’s it a basic asp table design completed.
Dynamically adding rows to the table:

I coded according to get same look as our first image. Just add a table tag in .aspx page and add server side code in page load area.
.aspx
<asp:Table ID="Table2" runat="server">
</asp:Table>
.cs
protected void Page_Load(object sender, EventArgs e)
{
Table2.Caption = "Customer Details";
TableRow tr = new TableRow();
TableCell th1 = new TableCell();
TableCell th2 = new TableCell();
tr.BackColor = Color.Silver;
th1.Text = "First Name";
th2.Text = "Second Name";
tr.Cells.Add(th1);
tr.Cells.Add(th2);
Table2.Rows.Add(tr);
TableRow tr1 = new TableRow();
TableCell tc1 = new TableCell();
TableCell tc2 = new TableCell();
tc1.Text = "Emmaneale";
tc2.Text = "Mendu";
tr1.Cells.Add(tc1);
tr1.Cells.Add(tc2);
Table2.Rows.Add(tr1);
TableRow tr2 = new TableRow();
TableCell tc3 = new TableCell();
TableCell tc4 = new TableCell();
tc3.Text = "Swetha";
tc4.Text = "Patcha";
tr2.Cells.Add(tc3);
tr2.Cells.Add(tc4);
Table2.Rows.Add(tr2);
}
As of now if you try this example you should come to know a basic design and how to dynamically add rows in a table.
That’s it a small post on Table Server control Thanks for Reading.
Yours
Emmaneale Mendu
Web Developer

In the above figure you can see two headers (“First Name” and “Last Name”). We can use any header here. We have three tags to use in asp table tag
<asp:TableFooterRow></asp:TableFooterRow>
<asp:TableHeaderRow></asp:TableHeaderRow>
<asp:TableRow></asp:TableRow>
You can copy the code below to get the above webpage design
.aspx
<asp:Table ID="Table1" runat="server" Caption="Customer Details">
<asp:TableRow ID="trheader" BackColor="Silver" runat="server" ForeColor="Black" Font-Bold="true">
<asp:TableHeaderCell>First Name</asp:TableHeaderCell>
<asp:TableHeaderCell>Last Name</asp:TableHeaderCell>
</asp:TableRow>
<asp:TableRow>
<asp:TableCell>Emmaneale</asp:TableCell>
<asp:TableCell>Mendu</asp:TableCell>
</asp:TableRow>
<asp:TableRow>
<asp:TableCell>Swetha</asp:TableCell>
<asp:TableCell>Patcha</asp:TableCell>
</asp:TableRow>
</asp:Table>
That’s it a basic asp table design completed.
Dynamically adding rows to the table:

I coded according to get same look as our first image. Just add a table tag in .aspx page and add server side code in page load area.
.aspx
<asp:Table ID="Table2" runat="server">
</asp:Table>
.cs
protected void Page_Load(object sender, EventArgs e)
{
Table2.Caption = "Customer Details";
TableRow tr = new TableRow();
TableCell th1 = new TableCell();
TableCell th2 = new TableCell();
tr.BackColor = Color.Silver;
th1.Text = "First Name";
th2.Text = "Second Name";
tr.Cells.Add(th1);
tr.Cells.Add(th2);
Table2.Rows.Add(tr);
TableRow tr1 = new TableRow();
TableCell tc1 = new TableCell();
TableCell tc2 = new TableCell();
tc1.Text = "Emmaneale";
tc2.Text = "Mendu";
tr1.Cells.Add(tc1);
tr1.Cells.Add(tc2);
Table2.Rows.Add(tr1);
TableRow tr2 = new TableRow();
TableCell tc3 = new TableCell();
TableCell tc4 = new TableCell();
tc3.Text = "Swetha";
tc4.Text = "Patcha";
tr2.Cells.Add(tc3);
tr2.Cells.Add(tc4);
Table2.Rows.Add(tr2);
}
As of now if you try this example you should come to know a basic design and how to dynamically add rows in a table.
That’s it a small post on Table Server control Thanks for Reading.
Yours
Emmaneale Mendu
Web Developer
ImageMap Server Control
ImageMap control is introduced to get Navigation property to Image control as you see image control is missing Navigationurl property. You can have group of images in one image and we can navigate to one or more different url’s. As I mentioned to different url’s I will show you with an example before goin to the example stuff lets see imagemap properties.
Hot spots features:
• Each hot spots is characterized by various attributes like shape, location and size.
• Overlapping hotspots are perfectly valid.
• Hotspots are defined using x and y coordinates.
Types of hot spots
• CircleHotSpot
• RectangleHotSpot
• PolygonHotSpot
CircleHotSpot
We should define X, Y and radius to get this property.
RectangleHotSpot
We should defne Top,Buttom,Left and Right coordinates to get this property.

I got four images in one image and maping images using imagemap to navigation property. when the user clicks on circle or rectangle images I used navigation property to redirect to different urls. As shown above figure the code looks like this.
<asp:ImageMap ID="ImageMap1" runat="server" Height="300px" ImageUrl="~/Images/ImageMap.JPG" Width="300px">
<asp:CircleHotSpot Radius="40" AlternateText="Go to CoolTuts" X="50" Y="218" Target="_blank" NavigateUrl="http://www.cooltuts.com/" />
<asp:RectangleHotSpot AlternateText="Go to Bing" Left="17" Right="85" Top="27" Target="_blank" Bottom="110" NavigateUrl="http://www.bing.com/" />
<asp:RectangleHotSpot AlternateText="Go to Google" Left="140" Right="290" Top="27" Target="_blank" Bottom="110" NavigateUrl="http://www.google.com/" />
<asp:RectangleHotSpot AlternateText="Go to Yahoo" Left="185" Right="255" Top="140" Target="_blank" Bottom="287" NavigateUrl="http://www.Yahoo.com/" />
</asp:ImageMap>
That’s it, test it and let me know if any Questions?
Thanks,
Emmaneale Mendu
Web Developer
Hot spots features:
• Each hot spots is characterized by various attributes like shape, location and size.
• Overlapping hotspots are perfectly valid.
• Hotspots are defined using x and y coordinates.
Types of hot spots
• CircleHotSpot
• RectangleHotSpot
• PolygonHotSpot
CircleHotSpot
We should define X, Y and radius to get this property.
RectangleHotSpot
We should defne Top,Buttom,Left and Right coordinates to get this property.

I got four images in one image and maping images using imagemap to navigation property. when the user clicks on circle or rectangle images I used navigation property to redirect to different urls. As shown above figure the code looks like this.
<asp:ImageMap ID="ImageMap1" runat="server" Height="300px" ImageUrl="~/Images/ImageMap.JPG" Width="300px">
<asp:CircleHotSpot Radius="40" AlternateText="Go to CoolTuts" X="50" Y="218" Target="_blank" NavigateUrl="http://www.cooltuts.com/" />
<asp:RectangleHotSpot AlternateText="Go to Bing" Left="17" Right="85" Top="27" Target="_blank" Bottom="110" NavigateUrl="http://www.bing.com/" />
<asp:RectangleHotSpot AlternateText="Go to Google" Left="140" Right="290" Top="27" Target="_blank" Bottom="110" NavigateUrl="http://www.google.com/" />
<asp:RectangleHotSpot AlternateText="Go to Yahoo" Left="185" Right="255" Top="140" Target="_blank" Bottom="287" NavigateUrl="http://www.Yahoo.com/" />
</asp:ImageMap>
That’s it, test it and let me know if any Questions?
Thanks,
Emmaneale Mendu
Web Developer
Monday, October 4, 2010
Image Server Control
If you like photo shooting this control is very important in your life, to show your photos to your friends on a web page you can use ASP Image control. It’s a simple server control where you can display your images on your Web page from the server-side code.
A typical Image control is constructed on web page as shown below.
<asp:Image ID="Image1" Width="300px" Height="300px" ImageUrl="~/Images/CoolTuts.JPG"
runat="server" />
ImageUrl is very important property in our Image Server Control. In this property I am taking a image(CoolTuts.JPG) from Images folder.
Basic Image Control Example

In the above figure I used Image Controls to display three same images with different sizes. If you want to try this just refer to below .aspx source code.
.aspx
<table width="450px">
<tr>
<td rowspan="2">
<asp:Image ID="Image1" Width="300px" ImageUrl="~/Images/CoolTuts.JPG" runat="server" />
</td>
<td>
<asp:Image ID="Image2" Width="150px" ImageUrl="~/Images/CoolTuts.JPG" runat="server" />
</td>
</tr>
<tr>
<td>
<asp:Image ID="Image3" Width="150px" ImageUrl="~/Images/CoolTuts.JPG" runat="server" />
</td>
</tr>
</table>
Its pretty easy right?
Lets work on another example using different images on one Image Control.


As you see above three Images I am using one image control and three button controls. When the user clicks on “Cooltuts Image” Image control changes to CoolTuts Image and same way other two buttons PleaseWait and Submit buttons too.
Code and functionality looks as shown below.
.aspx
<form id="form1" runat="server">
<div>
<asp:Image ID="imgMain" Width="300px" ImageUrl="~/Images/CoolTuts.JPG" runat="server" />
<br />
<asp:Button ID="btnCoolTuts" runat="server" Text="CoolTuts Image" BackColor="White" OnClick="btnCoolTuts_Click" />
<br />
<asp:Button ID="btnPleaseWait" runat="server" BackColor="White" Text="PleaseWait Image" OnClick="btnPleaseWait_Click" />
<br />
<asp:Button ID="btnSubmit" runat="server" BackColor="White" Text="Submit Image" OnClick="btnSubmit_Click" />
</div>
</form>
.cs
public partial class ImageControl : System.Web.UI.Page
{
protected void Page_Load(object sender, EventArgs e)
{
}
protected void btnCoolTuts_Click(object sender, EventArgs e)
{
ReplaceImage(1);
}
protected void btnPleaseWait_Click(object sender, EventArgs e)
{
ReplaceImage(2);
}
protected void btnSubmit_Click(object sender, EventArgs e)
{
ReplaceImage(3);
}
/// <summary>
/// Replace Images According to the Button Clicks
/// </summary>
/// <param name="Number"></param>
private void ReplaceImage(int Number)
{
if (Number == 1)
{
imgMain.ImageUrl = "~/Images/CoolTuts.JPG";
ResetColor();
btnCoolTuts.BackColor = Color.Blue;
btnCoolTuts.ForeColor = Color.White;
}
else if (Number == 2)
{
imgMain.ImageUrl = "~/Images/PleaseWait.JPG";
ResetColor();
btnPleaseWait.BackColor = Color.Blue;
btnPleaseWait.ForeColor = Color.White;
}
else
{
imgMain.ImageUrl = "~/Images/Submit.JPG";
ResetColor();
btnSubmit.BackColor = Color.Blue;
btnSubmit.ForeColor = Color.White;
}
}
/// <summary>
/// Reset all buttons to Default Colors
/// </summary>
private void ResetColor()
{
btnCoolTuts.BackColor = Color.White;
btnCoolTuts.ForeColor = Color.Black;
btnPleaseWait.BackColor = Color.White;
btnPleaseWait.ForeColor = Color.Black;
btnSubmit.BackColor = Color.White;
btnSubmit.ForeColor = Color.Black;
}
}
I am using three button click events and two other functions. That’s it try this on your computer and let me know if any questions or mistakes by me through comments for this post.
Thanks
Emmaneale Mendu
Web Developer
A typical Image control is constructed on web page as shown below.
<asp:Image ID="Image1" Width="300px" Height="300px" ImageUrl="~/Images/CoolTuts.JPG"
runat="server" />
ImageUrl is very important property in our Image Server Control. In this property I am taking a image(CoolTuts.JPG) from Images folder.
Basic Image Control Example

In the above figure I used Image Controls to display three same images with different sizes. If you want to try this just refer to below .aspx source code.
.aspx
<table width="450px">
<tr>
<td rowspan="2">
<asp:Image ID="Image1" Width="300px" ImageUrl="~/Images/CoolTuts.JPG" runat="server" />
</td>
<td>
<asp:Image ID="Image2" Width="150px" ImageUrl="~/Images/CoolTuts.JPG" runat="server" />
</td>
</tr>
<tr>
<td>
<asp:Image ID="Image3" Width="150px" ImageUrl="~/Images/CoolTuts.JPG" runat="server" />
</td>
</tr>
</table>
Its pretty easy right?
Lets work on another example using different images on one Image Control.


As you see above three Images I am using one image control and three button controls. When the user clicks on “Cooltuts Image” Image control changes to CoolTuts Image and same way other two buttons PleaseWait and Submit buttons too.
Code and functionality looks as shown below.
.aspx
<form id="form1" runat="server">
<div>
<asp:Image ID="imgMain" Width="300px" ImageUrl="~/Images/CoolTuts.JPG" runat="server" />
<br />
<asp:Button ID="btnCoolTuts" runat="server" Text="CoolTuts Image" BackColor="White" OnClick="btnCoolTuts_Click" />
<br />
<asp:Button ID="btnPleaseWait" runat="server" BackColor="White" Text="PleaseWait Image" OnClick="btnPleaseWait_Click" />
<br />
<asp:Button ID="btnSubmit" runat="server" BackColor="White" Text="Submit Image" OnClick="btnSubmit_Click" />
</div>
</form>
.cs
public partial class ImageControl : System.Web.UI.Page
{
protected void Page_Load(object sender, EventArgs e)
{
}
protected void btnCoolTuts_Click(object sender, EventArgs e)
{
ReplaceImage(1);
}
protected void btnPleaseWait_Click(object sender, EventArgs e)
{
ReplaceImage(2);
}
protected void btnSubmit_Click(object sender, EventArgs e)
{
ReplaceImage(3);
}
/// <summary>
/// Replace Images According to the Button Clicks
/// </summary>
/// <param name="Number"></param>
private void ReplaceImage(int Number)
{
if (Number == 1)
{
imgMain.ImageUrl = "~/Images/CoolTuts.JPG";
ResetColor();
btnCoolTuts.BackColor = Color.Blue;
btnCoolTuts.ForeColor = Color.White;
}
else if (Number == 2)
{
imgMain.ImageUrl = "~/Images/PleaseWait.JPG";
ResetColor();
btnPleaseWait.BackColor = Color.Blue;
btnPleaseWait.ForeColor = Color.White;
}
else
{
imgMain.ImageUrl = "~/Images/Submit.JPG";
ResetColor();
btnSubmit.BackColor = Color.Blue;
btnSubmit.ForeColor = Color.White;
}
}
/// <summary>
/// Reset all buttons to Default Colors
/// </summary>
private void ResetColor()
{
btnCoolTuts.BackColor = Color.White;
btnCoolTuts.ForeColor = Color.Black;
btnPleaseWait.BackColor = Color.White;
btnPleaseWait.ForeColor = Color.Black;
btnSubmit.BackColor = Color.White;
btnSubmit.ForeColor = Color.Black;
}
}
I am using three button click events and two other functions. That’s it try this on your computer and let me know if any questions or mistakes by me through comments for this post.
Thanks
Emmaneale Mendu
Web Developer
CoolTuts - Performance Testing - Benchmark design
Benchmark is representative workload used during performance test run.
Benchmark is provided by client.
Benchmark is provided by client.
Subscribe to:
Posts (Atom)