by Emmaneale Mendu, Web Developer
In this post - we look at how to create a custom server control and Test the control in Web Page.
To Create the custom control(Microsoft Visual Studio 2008)
Note:: Click on the image if they are not clear
- From the File Menu select New Project
- Now you see New Project Window, Select Web in Project types section, ASP.NET Server Control in Templates Section. Change Desire Name "SampleCustomControl" as shown below,
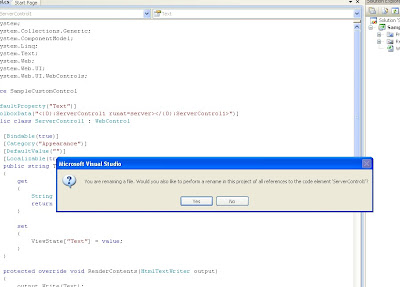
- Change ServerControl.cs to WelcomeLoginControl.cs as shown below
- Click Yes
- Delete the code and change it to as shown below
- Open AsseblyInfo.cs
Add this at the First Line
using System.Web.UI; At the End of the Page add this - And then Build it


using System;
using System.Collections.Generic;
using System.ComponentModel;
using System.Linq;
using System.Text;
using System.Web;
using System.Web.UI;
using System.Web.UI.WebControls;
namespace aspWelcomeLabel
{
public class WelcomeLoginControl : System.Web.UI.WebControls.WebControl, INamingContainer
{
//Label Control Fields
protected TextBox txtFirstName = new TextBox();
protected TextBox txtSecondName = new TextBox();
//TextBox Control Fields
protected Label lblFirstName = new Label();
protected Label lblSecondName = new Label();
protected Label lblWelcome = new Label();
//Button and Required Fields
protected Button btnSubmit = new Button();
protected RequiredFieldValidator rfFirstName;
protected RequiredFieldValidator rfSecondName;
public override ControlCollection Controls
{
get
{
EnsureChildControls();
return base.Controls;
}
}
protected override void CreateChildControls()
{
Controls.Clear();
//Assign Properties to TextBox Controls
txtFirstName.ID = "txtFirstName";
txtSecondName.ID = "txtSecondName";
lblWelcome.ID = "lblWelcome";
//Assign Properties to Label Controls
lblFirstName.Text = "First Name";
lblSecondName.Text = "Last Name";
//Assign Properties to Button and RequiredField validator Controls
btnSubmit.Text = "Submit";
btnSubmit.Click += new EventHandler(btnSubmit_Click);
rfFirstName = new RequiredFieldValidator();
rfSecondName = new RequiredFieldValidator();
rfFirstName.ControlToValidate = txtFirstName.ID;
rfSecondName.ControlToValidate = txtSecondName.ID;
rfFirstName.ErrorMessage = "First Name is Required";
rfSecondName.ErrorMessage = "Second Name is Required";
Controls.Add(lblFirstName);
Controls.Add(txtFirstName);
Controls.Add(rfFirstName);
Controls.Add(new LiteralControl("<br />"));
Controls.Add(lblSecondName);
Controls.Add(txtSecondName);
Controls.Add(rfSecondName);
Controls.Add(new LiteralControl("<br />"));
Controls.Add(btnSubmit);
Controls.Add(new LiteralControl("<br />"));
Controls.Add(lblWelcome);
}
private void btnSubmit_Click(object sender, EventArgs e)
{
EnsureChildControls();
lblWelcome.Text = "Welcome " + txtFirstName.Text + " " + txtSecondName.Text;
}
}
}
[assembly: TagPrefix("SampleCustomControl", "AspSample")]
AssemblyInfo.cs looks like this
using System.Reflection;
using System.Runtime.CompilerServices;
using System.Runtime.InteropServices;
using System.Web.UI;
// General Information about an assembly is controlled through the following
// set of attributes. Change these attribute values to modify the information
// associated with an assembly.
[assembly: AssemblyTitle("aspWelcomeLabel")]
[assembly: AssemblyDescription("")]
[assembly: AssemblyConfiguration("")]
[assembly: AssemblyCompany("BrownGreer PLC")]
[assembly: AssemblyProduct("aspWelcomeLabel")]
[assembly: AssemblyCopyright("Copyright © BrownGreer PLC 2010")]
[assembly: AssemblyTrademark("")]
[assembly: AssemblyCulture("")]
// Setting ComVisible to false makes the types in this assembly not visible
// to COM components. If you need to access a type in this assembly from
// COM, set the ComVisible attribute to true on that type.
[assembly: ComVisible(false)]
// The following GUID is for the ID of the typelib if this project is exposed to COM
[assembly: Guid("e6a12269-411b-40ef-8cb2-2a01393ecbc7")]
// Version information for an assembly consists of the following four values:
//
// Major Version
// Minor Version
// Build Number
// Revision
//
// You can specify all the values or you can default the Build and Revision Numbers
// by using the '*' as shown below:
// [assembly: AssemblyVersion("1.0.*")]
[assembly: AssemblyVersion("1.0.0.0")]
[assembly: AssemblyFileVersion("1.0.0.0")]
[assembly: TagPrefix("aspWelcomeLabel", "aspSample")]
Test the Control in ASP.Net Web Page
- Create a New WebSite(Open File and New WebSite)
- Add .dll of SampleCustomControl to the Website Project to your toolbox
- Drag and drop the control to your page
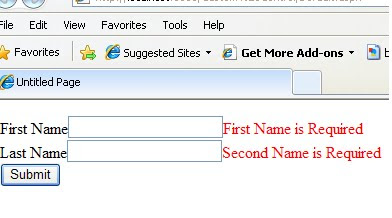
- Run and See it Works, Dont Forget to leave your
FeedBack - OutPut Looks Like this
- To Be Modified....
.aspx looks like this
<%@ Page Language="C#" AutoEventWireup="true" CodeFile="Default.aspx.cs" Inherits="_Default" %>
<%@ Register Assembly="aspWelcomeLabel" Namespace="aspWelcomeLabel" TagPrefix="aspSample" %>
<!DOCTYPE html PUBLIC "-//W3C//DTD XHTML 1.0 Transitional//EN" "http://www.w3.org/TR/xhtml1/DTD/xhtml1-transitional.dtd">
<html xmlns="http://www.w3.org/1999/xhtml">
<head runat="server">
<title>Untitled Page</title>
</head>
<body>
<form id="form1" runat="server">
<div>
<aspSample:WelcomeLoginControl ID="WelcomeLabel1" runat="server" />
</div>
</form>
</body>
</html>

Nice one and thanks for this helpful post. Great job.
ReplyDeleteThanks Dear
ReplyDeleteIt's really good and Post more example in ASP.NET ....Thanks you ..........
ReplyDelete